


Key Takeaways
- Ice dams occur when heat leaks into the attic, melting snow on the roof that refreezes at the eaves. They can lead to roof leaks, insulation damage, and HVAC failures.
- Better attic insulation, balanced ventilation using continuous soffit and ridge vents, and sealing air leaks around hatches, ducts, and penetrations will prevent heat loss that causes ice dams.
- Control snow and gutters. Safely remove snow with a roof rake, keep gutters clean or install heated cables, and knock down heavy icicles to prevent ice dams and water damage.
- Protect outdoor HVAC units by elevating and sheltering. Clear snow and ice after storms. Keep vents and flues unblocked to prevent performance loss and safety hazards.
- Opt for a whole-house approach mixing insulation, ventilation, air sealing, and HVAC tuning and book an energy audit to identify the most effective long-term upgrades.
- Out in the open: Embrace seasonal inspections and call in the pros for complicated repairs. Watch for early warning signs such as uneven roof melt or ceiling stains. Prioritize long-term solutions instead of temporary quick fixes.
This post is about how to prevent ice dams and protect your HVAC. It includes roof insulation, attic ventilation, gutter maintenance, and safe roof snow removal.
The guide mentions HVAC inspections, pipe insulation, and thermostat adjustments that reduce freeze damage and improve energy efficiency. Readers receive specific, actionable steps and seasonal timing to keep roofs and HVAC systems humming efficiently and avoid expensive fixes.
Understanding The Threat
Ice dams occur when roof surfaces have different temperatures, causing snow to melt on the warmer upper sections and refreeze at the colder eaves. Meltwater runs downslope until it hits the colder edge, then freezes into a ridge of ice that impounds water behind it. This trapped water can back up underneath shingles and enter the roof assembly.
The susceptibility is greatest around eaves, valleys, and dormer walls where warm air and snow mix.
The Formation
Warm air leaking from the living space into the attic raises roof deck temperatures. That melt then runs downslope and refreezes at the eaves in proximity to 32-degree temperatures. Uneven roof temperatures, caused by defective or absent insulation and by heat leaks surrounding chimneys, light shafts, and recessed fixtures, provide the precise environment for upslope meltwater and ice dams.
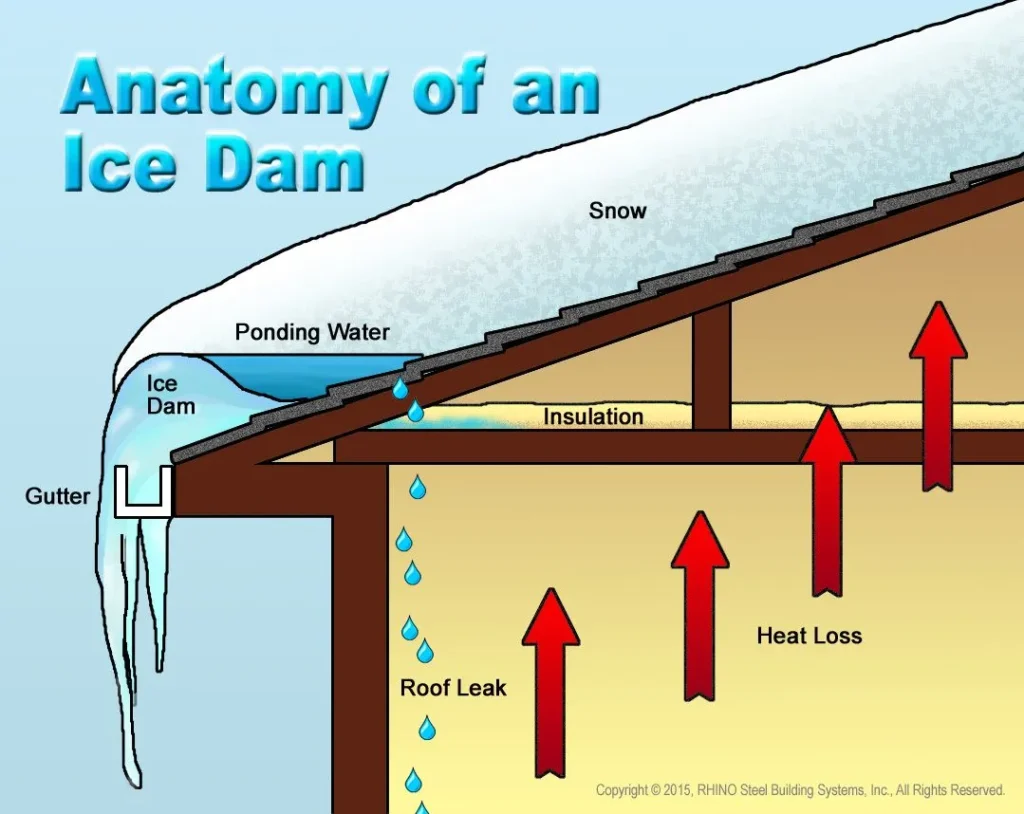
Heavy snow piles behave like an insulating blanket, keeping upper roof areas warmer and speeding up the melt-refreeze cycle. Poor attic ventilation, which includes no continuous ridge and soffit vents or blocked vents, stops cold air from getting to the roof deck and causes ice to form faster.
When frozen dams form at the eaves, water drainage is blocked and water pools behind the ice, seeping any way it can into the structure and leaking.
The Damage
This causes roof leaks, water in your walls and ceiling, and destroyed attic insulation that doesn’t insulate anymore. The combined weight of ice and trapped water can warp roof decking and create cracks and stains along seams in ceiling drywall.
In time, repeated freeze-thaw cycles accelerate roof deck deterioration and can loosen fasteners and shingles. Massive blocks of ice or solid snow sliding off a roof can tip the scales at thousands of pounds and fall in an unpredictable manner, potentially injuring people, pets or damaging property below.
If left unchecked, leaks encourage mold to flourish and deteriorate indoor air quality, leading to healing and remediation expenses that frequently transcend original repair costs.
The HVAC Link
Ice dams may block or crush roof vents, exhausts, and flues, lessening draft and straining combustion appliances and furnaces. Water intrusion can get to HVAC equipment in attics or crawl spaces, corroding electrical components and insulation and causing premature failure or expensive repairs.
Blocked exhaust routes increase the potential for backdrafting and pushing combustion gases, including carbon monoxide, into the living space. Soaked or compacted attic insulation from leaks forces your HVAC system to run longer in order to keep temperatures at their set levels, which drives energy consumption and stresses components.
Preventative roof maintenance, quality insulation, and appropriate ridge and soffit ventilation safeguard your roof and HVAC systems from these domino effects.
How To Prevent Ice Dams
A properly ventilated and well sealed attic is the key to fighting ice dams. Cold air under the roof and a continuous air barrier at the ceiling keep roof surfaces cold, so snow doesn’t melt, refreeze at the eaves, and form ice. They detail how to prevent ice dams with a checklist that specifies what, where, and how to concentrate efforts before the winter.
1. Improve Insulation
Insulate attic with local climate rating or better if existing insulation is less than 12 inches. Supplement it. Fill uneven cavities and reduce thermal bridges with blown-in fiberglass or spray foam. Ensure coverage extends to attic kneewalls, top plates, and the attic hatch. Gaps at these locations allow warm air to enter the attic.
Put insulation dams around eaves so loose-fill doesn’t clog soffit vents and airflow. Use foil-faced fiberglass wrap for ducts over the attic floor. This adds only about R5 to R6 but can reduce heat transfer from ducts to attic air. For new construction, install a complete, 100% effective air barrier at the ceiling plane to prevent convective heat loss.
2. Enhance Ventilation
Install continuous soffit vents with a ridge vent to draw cold air beneath the full length of the roof. Balance inlet and outlet: the openings should match and provide at least 1 square meter of net free vent area per 300 square meters of attic floor. This keeps attic temperatures close to outside and minimizes snowmelt.
Keep gable vents, eaves and ridge channels free of debris and verify that ridge vent paths aren’t obstructed by insulation or batten. Ridge vents should be checked for snow blockage as well. In heavy snow areas, design details that minimize blockage are critical.
Mechanical attic fans are not a universal solution and can be problematic in certain climates. Install them only after a professional has evaluated your particular situation.
3. Seal Air Leaks
Identify leaks around attic hatches, recessed lights, duct boots, and ceiling drywall seams and seal them. Weatherstrip access points and seal gaps around chimneys, plumbing stacks, and cables with the appropriate sealants. Use continuous air barrier materials where feasible.
Common leaks and fixes:
- Attic hatch — foam gasket and perimeter seal.
- Duct boot: spray foam or sheet metal collar sealed with mastic.
- Recessed lights — use airtight covers or IC-rated fixtures with sealed trim.
4. Manage Snow
After storms, clear snow with a roof rake from the lower 0.9–1.2 m (3–4 ft) of roof. Work from the bottom when you can and stay away from sharp instruments that can slice shingles. Watch structural snow load limits and call for professional heavy accumulations.
5. Maintain Gutters
Clean gutters and downspouts prior to freezing weather, as clogged channels contribute to ice buildup. Add gutter guards or heat cables as necessary and divert runoff away from the foundation. Fix sagging sections and broken drip lines to keep meltwater running off the roof.
Protecting Your HVAC
Protecting your HVAC equipment from ice dams and winter weather means a mix of physical barriers, good site planning, regular cleaning and timely maintenance. Brief context: outdoor units, vents, and the building envelope interact during winter. Failures in one area can cause system stress or safety hazards in another.
These sub sections deal with real-world actions, examples, and checklists to keep systems dependable.
Outdoor Unit
Protect Your HVAC by placing a low open-sided shelter or barrier to prevent falling ice and keep airflow unobstructed. For example, a sloped metal awning two to four feet above the unit deflects runoff yet leaves room for service.
Put in a specially made protective HVAC cover or ice guard that is breathable and non-moisture-trapping. Such shields prevent ice chunks from denting fins and blades and allow venting.
Clear snow and ice from the unit surface and around the pad after every storm. Protecting Your HVAC involves using a soft-bristled broom or a plastic shovel and not prying on coils.
Leave a 0.5 to 1 meter perimeter clear to provide unobstructed intake and discharge paths. If the unit sits near a driveway or walkway, anticipate more thrown or compacted ice impact, perhaps a barrier or higher pad location.
Make sure the pad is above anticipated snow and meltwater levels. Elevation diminishes the danger of standing water that freezes around the base and seeps into electrical enclosures.
Check drainage by sloping the ground away, using crushed stone, or adding a drainpipe to carry meltwater clear. Monitor coils and fan blades for ice accumulation.
If you notice ice, turn off according to the manufacturer’s instructions and call a technician. Protect Your HVAC: Early inspection and repair when signs appear save you on winter operating costs and larger failures.
Vents & Flues
Check furnace flues, exhaust vents and intake pipes for snow, ice or damming. Ensure terminations are above the average snow level in your region and extend vents if needed.
Place vent shields where icicles form from roof runoff to prevent openings from closing and keep exhaust vent clear. Cleaning out your vents and downspouts before the cold weather arrives helps water drain properly and reduces the risk of blockage.
Inspect air intake and exhaust as part of your quarterly checks to identify blockages early and prevent safety concerns such as backdrafting.
Water Intrusion
Watch your attic and ceilings for leaks, stains, or wet insulation. These are early symptoms of ice-dam intrusion. Apply water membranes or vapor barriers on susceptible roof decks and caulk around register boots, return ducts, and flex duct connections to prevent humid air intrusion into cool cavities.
Fix roof leaks or flashing failures as soon as they are discovered to safeguard insulation and HVAC components. Points to watch for winter moisture include:
- Discolored ceiling paint or brown water streaks
- Soft or sagging drywall near eaves or rooflines
- Musty odors in attics or upper rooms
- Damp or compressed attic insulation
- Frost or ice on attic-side roof sheathing
The Whole-House Approach
A whole-house approach views ice dams as a symptom of bigger energy and moisture flow problems. It places emphasis on the roof assembly, attic, and HVAC together. That involves better insulation, air sealing, and duct and mechanical system balancing so heat does not migrate to the attic in a patchy manner and melt snow that then refreezes on the eaves.
Energy Audits
Get a home energy audit to locate heat loss and air leaks where warm, moist air enters the attic. Auditors deploy blower-door tests, infrared cameras, and borescopes to identify leakage paths and cold spots. They gauge insulation depth.
Loose-fill cellulose and fiberglass compress and settle and can leave gaps. After the audit, create a prioritized plan: seal attic bypasses first, then add insulation where R-value is low. Common attic air sealing and insulation jobs run $1,000 to $4,500 (convert for local currency).
Track energy use and bills pre- and post-work to measure gains and watch for a decline in ice-dam incidents.
System Balance
Whole-House Approach balances HVAC so heat is distributed evenly through the living space instead of creating hot spots under the roof. Set thermostats and zoning controls to prevent overheating rooms above the attic.
Adjust dampers, check return-air paths, and ensure supply registers are not obstructed by furniture. Seal and insulate ducts in unconditioned spaces. Uninsulated ducts leak heat and alter attic temperatures.
Check system performance seasonally. After heavy snowfalls, make sure there are no sudden heat leaks into attic spaces that could cause roof snow to melt unevenly and create dams.
Material Choices
Select higher R-value insulation appropriate for cold climates. Blown cellulose, mineral wool, and closed-cell spray foam all have trade-offs in cost, air sealing, and moisture management.
Add continuous insulation with rigid foam board in roof perimeters or cathedral ceilings. For roof surfaces, opt for membranes and shingles with robust warranty terms that provide ice-dam protection.
Strengthen weak edge and valley rooflines with steel flashing and hardy underlays. At key locations, add rock wool or rigid foam to provide a thermal break that reduces heat transmission to eaves.
A whole-house plan includes operational steps: remove the lower 0.9–1.2 meters (3–4 feet) of snow with a roof rake after storms, and coordinate HVAC upgrades with envelope fixes so one change does not negate another.
To prevent ice dams, you must address the root causes, not just the ice.
A Proactive Mindset
A proactive mindset helps minimize the risk of ice dams and safeguards HVAC units by moving activity in front of trouble. Expect soft points, establish specific objectives for inspections and improvements, and educate family members to identify early indications.
It reduces repair expenses, decreases stress, and boosts home maintenance confidence.
Seasonal Checks
Do roof and attic inspections before and after winter to spot loose shingles, clogged gutters, or gaps in the rafters. Seek out wet insulation, dark streaks, or rot. Identify with a mark and measure any spaces with a tape measure.
Check your attic ventilation by inspecting intake and exhaust vents for blockage and by measuring temperatures. If the attic temperature differs from outside air by more than 20 °C (36 °F), ventilation is inadequate. Check insulation coverage for even depth and zero gaps. Batt or blown insulation must meet local R values. Replace or top up if thin.
Check HVAC equipment and outdoor units for winter readiness: clear debris, elevate units if needed, inspect condensate lines for blockages, and confirm thermostat batteries. Check roof and wall vents and exhausts to be certain all are sealed and open (use a smoke pencil or incense to visualize airflow in vents).
Create a checklist: roof edge and gutter cleanness, shingle condition, attic insulation depth and evenness, vent clearances, HVAC outdoor unit clearance, pipe insulation, and attic access seal. Assign dates, responsible person, and notes field for follow-up.
Early Warning Signs
Keep an eye out for large icicles, uneven snow melt on the roof and water stains on ceilings, all of which are prime signs of heat loss and ice-dam formation. Thick icicles are usually a sign of warm patches in the roofline, and uneven snow formations indicate heat being lost from certain roof sections.
Listen for new drips or puddles forming inside the attic or along exterior walls. Small leaks become big very quickly. Recognize rapid increases in energy bills as an indication that you might be losing heat from your living space into the attic.
Monitor bills monthly to detect changes early. Photograph and record all warning signs with dates and locations for a trend record. This assists contractors in diagnosing recurring issues and can aid warranty or insurance claims.
Professional Help
Hire professional contractors or HVAC technicians to handle tricky insulation, ventilation, or roof repairs. Ask to see their license and insurance. Request detailed bids that include scope, materials, R-values, and timeline.
Shop around with a minimum of three quotes. Ask for quotes on professional ice-dam removal if buildup is significant. Safe removal often requires work from the roof and specialized equipment.
Make sure everything is done to building code and manufacturer warranty guidelines. I was wondering if local utilities or HVAC firms might provide a free home comfort guide or prevention flyer to follow and pass around the household to be more proactive about their habits.
My Perspective
Ice dams occur when heat escapes into the attic and melts the snow on the roof, refreezing at the eaves. This results in water pooling that can seep back under shingles, leading to leaks, rot, and thousands of dollars in roof and interior damage.
In addition to protecting your roof, preventing ice dams protects the HVAC system, which tends to work harder and fall short of its efficiency when the building envelope is breached.
The Quick Fix Trap
Temporary solutions like heated cable, salt, or quick roof melting can eliminate ice in the immediate, but don’t address the underlying cause of ice formation. Hot tape can get you through a season or so, but it jeopardizes the roof membrane and likely voids certain roofing warranties.
Salt or chemical melts may eat away at metal flashings and gutters. Depending on these techniques allows heat to keep radiating into your attic through cracks, inadequate insulation, or air leaks.
Putting a bandaid over the root causes, such as low insulation levels, poor air sealing around chimneys and recessed lights, and inadequate ventilation, leaves you with recurring issues. I learned this the hard way.
One winter, I used a roof rake and heated cable after a storm, only to see new dams form the next month because attic insulation was thin. Long term solutions break the cycle and minimize repair calls.
Focus on whole-house fixes: Increase attic insulation to recommended levels for your climate, seal air leaks, and balance ventilation so cold air comes in at soffits and warm air exits at the ridge.
The Hidden Costs
Neglect means structural damage, ruined ceilings, insulation soaked, and HVAC systems working overtime just to hit setpoints. Energy bills soar as heat escapes into the attic, so a reasonable 3 to 5 degrees Celsius thermostat reduction during storms works to counter that heat escape motivation.
For cost perspective, compare quick fixes versus upgrades: emergency roof patching can run into thousands, while proper insulation and ventilation give multi-year returns.
| Damage Type | Typical Cost Estimate (currency neutral) | Cause |
|---|---|---|
| Roof shingle replacement | 1,500–6,000 | Water under shingles from damming |
| Interior ceiling repair | 500–3,000 | Leak-related plaster and paint damage |
| HVAC service or premature replacement | 800–5,000 | Overwork and moisture intrusion |
| Insulation replacement (wet) | 1,000–4,000 | Saturated insulation losing R-value |
Averting waste pays. A one-time insulation upgrade typically costs less than ongoing emergency repairs.
The Long-Term Value
Invest in insulation rated for your region: aim for R-49 or higher in cold climates. R-30 to R-49 may suit milder areas. Balanced ventilation, with soffit intake and ridge exhaust, stabilizes roof deck temperatures and prevents the melt-refreeze cycle.
Simple habits matter: wear an extra layer inside during heavy snow, lower the thermostat a few degrees, and use a roof rake after snowfall to keep the roof surface even and cold.
Replacing it with a tight, efficient HVAC system minimizes heat loss and ventilates the air inside your home. The reward is reduced power consumption, less strain on infrastructure, and protection against winter storms.
Conclusion
Ice dams wreck roofs and tear up HVAC systems. Easy actions reduce that danger. Clean gutters, upgrade attic insulation to R-60 where possible, and caulk air leaks around lights, pipes, and chimneys. Use roof rakes immediately following heavy snow. Install roof edge heat tape just where necessary and adhere to manufacturer specifications. Keep HVAC units clear of snow and ice. Elevate outdoor condensing units on pads or brackets and cover vents facing heavy drift. Consider attic fans or a smart thermostat to maintain consistent temperatures and prevent warm spots that cause uneven snowmelt.
One smart strategy trumps speculation. Choose two fixes you can tackle this month and one professional assignment for the season. Looking for a quick checklist or a local pro referral? I can assist.
Frequently Asked Questions
What causes ice dams on roofs?
Ice dams are created when your home’s heat melts roof snow. Melted water runs to the colder roof edge and refreezes, making a dam that traps more water. Bad attic insulation and ventilation are the biggest culprits.
How do ice dams damage my HVAC system?
Ice dams can push water into attic spaces and wall cavities. Moisture can corrode ductwork, damage insulation, and short HVAC electrical components. This decreases efficiency and results in expensive repairs.
What are the fastest ways to prevent ice dams?
Increase attic insulation, supplement with roof and soffit venting, and maintain attic temperatures near outdoor temperatures. Utilize roof rakes to safely remove heavy snow after storms. These actions cut heat transfer and limit melting.
Are heat cables safe for preventing ice dams?
If installed correctly, ice-melt cables can do the trick. They carve pathways for water to leave the roof. Follow manufacturer recommendations and consult a licensed electrician for safe installation and power handling.
How should I protect outdoor HVAC units from ice and snow?
Raise the unit on a durable, weather-resistant platform. After storms, clear snow and ice away. In deep freezes, cover with a breathable cover to prevent melting moisture while still allowing airflow.
When should I call a professional about ice dams or HVAC risk?
Call a pro if you see recurring ice dams, roof leaks, visible duct condensation, or diminished HVAC performance. A qualified contractor can diagnose your insulation, ventilation, and equipment problems safely.
Can I prevent ice dams without major home upgrades?
Yes. Regular snow removal with a roof rake, sealing attic air leaks, and maintaining gutters all help. These are lower risk in the short term, but long-term prevention typically involves insulation and ventilation enhancements.